What to Do After a Day of Paintball – Gear Maintenance Basics
What to Do After a Day of Paintball: Gear Maintenance Basics
Introduction
After an exhilarating day of paintball, it’s essential to take care of your gear to ensure it remains in optimal condition for your next game and years to come. Proper paintball gear maintenance not only extends the life of your equipment but also enhances your performance on the field. Let’s cover the basics of after-paintball care, focusing on how to clean and maintain your gear effectively.
Essential Tools and Supplies
Before you start, gather the following tools and supplies:
- Microfiber Cloths: For wiping down surfaces.
- Squeegee or Pull-Through Cleaner: For cleaning the barrel.
- Q-tips: For cleaning small, hard-to-reach areas.
- Warm Water and Mild Soap: For cleaning masks and other gear.
- Marker Oil: For lubricating moving parts.
- Allen Wrenches: For disassembling your marker.
- Soft Brush: For scrubbing away dirt and debris.
- Compressed Air Canister: For blowing out dust and paint.
Step-by-Step Gear Maintenance Guide
1. Cleaning Your Paintball Marker 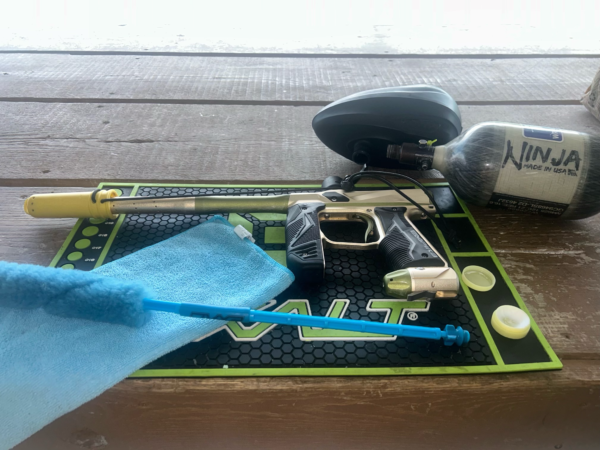

Disassemble the Marker
- Safety First: Ensure your marker is unloaded and the air source is disconnected. Double-check to make sure there are no paintballs in the chamber.
- Remove the Hopper: Detach the hopper from the marker.
- Detach the Barrel: Unscrew the barrel from the main body of the marker.
- Remove the Bolt and Bolt Assembly: Follow your marker’s manual to safely remove the bolt and its components.
- Separate the Air Source Adapter (ASA): If applicable, detach the ASA from the marker.
Clean the Barrel
- Use a Squeegee or Pull-Through Cleaner: Insert the squeegee or cleaner into the barrel and pull it through to remove paint and debris.
- Warm Water Rinse: Rinse the barrel with warm water to flush out any remaining residue.
- Dry Thoroughly: Use a microfiber cloth to dry the barrel completely. Ensure no moisture is left inside.
Clean the Bolt and Bolt Assembly
- Wipe Down with Microfiber Cloth: Use a microfiber cloth to clean the bolt and its assembly. Remove any paint, dirt, or oil.
- Q-tips for Tight Spots: Use Q-tips to clean small crevices and hard-to-reach areas within the bolt assembly.
- Lubricate: Apply a small amount of marker oil to the bolt and its moving parts. Avoid over-lubricating, as excess oil can attract dirt.
Clean the Marker Body
- Wipe Exterior: Use a damp microfiber cloth to wipe down the exterior of the marker. Avoid getting water inside the marker.
- Clean Internals: Use Q-tips and a soft brush to clean the internal components. Be gentle to avoid damaging any parts.
- Inspect for Damage: Check for any signs of wear or damage. Replace any worn-out parts as needed.
Reassemble the Marker
- Reassemble the Marker: Follow your marker’s manual to reassemble all components. Ensure everything is securely in place.
- Test Functionality: Once reassembled, test your marker to ensure it functions correctly. Dry fire a few shots to check for any issues.
Check out our visual guide for a step-by-step guide for cleaning a Tippmann marker!
2. Cleaning Your Paintball Mask
Disassemble the Mask
- Remove the Lens: Carefully remove the lens from the mask according to the manufacturer’s instructions.
Clean the Lens
- Rinse with Warm Water: Rinse the lens with warm water to remove paint and debris.
- Use Mild Soap: Apply a small amount of mild soap and gently clean the lens with your fingers.
- Rinse Thoroughly: Rinse off all soap residue with warm water.
- Dry with Microfiber Cloth: Gently pat the lens dry with a microfiber cloth. Avoid using paper towels, as they can scratch the lens.
Clean the Mask Frame
- Wipe with Damp Cloth: Use a damp microfiber cloth to wipe down the mask frame, removing paint and dirt.
- Check for Damage: Inspect the frame for any cracks or wear. Replace if necessary.
Reassemble the Mask
- Reattach the Lens: Carefully reattach the lens to the mask frame according to the manufacturer’s instructions.
3. Cleaning and Maintaining the Hopper
Disassemble the Hopper
- Remove Batteries: If your hopper is electronic, remove the batteries.
- Open the Hopper: Disassemble the hopper according to the manufacturer’s instructions.
Clean the Hopper
- Rinse with Warm Water: Rinse the hopper components with warm water to remove paint and debris.
- Use Mild Soap: Clean the hopper components with mild soap and a soft brush if necessary.
- Dry Thoroughly: Ensure all parts are completely dry before reassembling.
Reassemble the Hopper
- Reattach Components: Follow the manufacturer’s instructions to reassemble the hopper.
- Test Functionality: If your hopper is electronic, reinsert the batteries and test the hopper to ensure it works properly.
4. Cleaning and Maintaining Air Tanks
Check for Leaks
- Inspect O-rings: Check the O-rings on your air tank for wear or damage. Replace if necessary.
- Listen for Leaks: Attach the tank to your marker and listen for any hissing sounds indicating a leak.
Store Properly
- Release Pressure: When not in use, release the pressure from the tank to prevent damage.
- Store Upright: Store the tank upright in a cool, dry place.
5. Cleaning and Storing Protective Gear
Wash Soft Gear
- Remove Pads: If your gear has removable pads, take them out before washing.
- Machine Wash: Wash soft gear like jerseys, pants, and gloves in a washing machine using cold water and mild detergent.
- Air Dry: Hang your gear to air dry. Avoid using a dryer, as high heat can damage the materials.
Clean Hard Gear
- Wipe Down with Damp Cloth: Use a damp microfiber cloth to clean hard gear like chest protectors and elbow pads.
- Inspect for Damage: Check for any signs of wear or damage. Replace if necessary.
Store Properly
- Organize Gear: Store your gear in a dedicated bag or case to keep it organized and protected.
- Dry Thoroughly: Ensure all gear is completely dry before storing to prevent mold and mildew.
Advanced Gear Maintenance Tips
Regular Inspection
- Routine Checks: Regularly inspect all your gear for signs of wear and tear.
- Preventive Maintenance: Address minor issues promptly to prevent them from becoming major problems.
Upgrade Parts
- Performance Upgrades: Consider upgrading parts such as the bolt, barrel, or hopper for better performance.
- Durability Upgrades: Invest in high-quality gear that offers greater durability and reliability.
Professional Servicing
- Expert Maintenance: If you encounter persistent issues or are unsure about certain maintenance tasks, consider professional servicing.
- Paintball Shops: Many paintball shops offer maintenance services performed by experienced technicians.
Environmental Considerations
Eco-Friendly Cleaning
- Biodegradable Products: Use eco-friendly cleaning products to minimize environmental impact.
- Proper Disposal: Dispose of used cleaning materials responsibly. Avoid littering the field or natural areas.
Proper paintball gear maintenance is essential for ensuring optimal performance, durability, and safety. By following the steps and tips outlined in this guide, you can keep your equipment in top condition and ready for action at White River Paintball. Remember, regular maintenance not only enhances your gameplay but also extends the life of your gear, making it a cost-effective practice.